
One thing that I love to save is my time. Wouldn’t things just be that much better if you had a little more time? I want to show you a quick and fairly painless method of allowing your spreadsheet/dashboard user to update target numbers to monitor salesperson performance. What is going to save you time is showing you how you can use conditional formatting in Excel and combine it with an input range to build a dynamic key performance indicator table. Instead of having to tediously go in and update target numbers every month from the manage rules options of Excel conditional formatting, you can painlessly update your targets by simply updating your input range. Sounds easy, right? It is. So let’s have a look.
A Peak at the Final Product
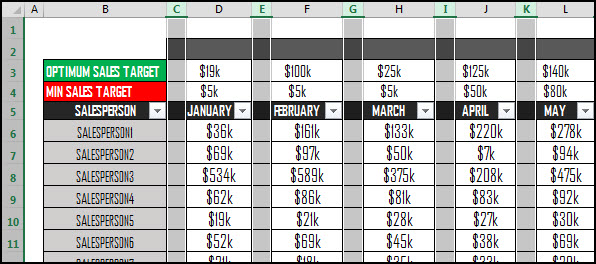
Here is a quick screen shot of what your final product will look like once you’ve completed this post. You’ll notice that any user using the spreadsheet/dashboard will be able to input their different optimum and minimum sales targets which will in turn change each of the salesperson’s icon display. If the salesperson for the given month sells more than the optimum sales target, the light icon will be green. If the value sold is between, the optimum and the minimum target, the light icon will be yellow. Finally, if the value sold for that month for the salesperson is less than the minimum target, the light icon will be red. You’ll notice that there are targets for each month of the year above the month column headings.

Download the Workbook for Free Before we Begin
The Excel file is indeed free. When you click the ‘GET IT FREE’ button be sure to enter in $0 for the value and this will remove the request for your credit card information. All you’ll need is your email address!
How to Build an Easy to Use Interface to Adjust Your Key Performance Targets Using Excel Conditional Formatting
I hate having to set things up twice or more times – and I think the same applies to you. To prevent this from happening, you’re only going to set things up once and then allow whoever is using your spreadsheet/workbook to handle the rest. You already need to setup 12 different conditional formatting rules referring to each of your monthly targets. You don’t want to have to setup these 12 rules every time you want to change your parameters. Here are a couple of screen shots showing you what you want to do versus what you don’t want to do.


[et_bloom_inline optin_id=”optin_1″]
Step 1: Setting up the Columns for Conditional Formatting
To separate and make the interface look clean (this is not required, you can display values with icons in the same cell), you can separate icons from your actual values that will be displayed. This will give us a column dedicated to displaying the proper icon based off of our targets versus our actual numbers. The reason I like doing this is because I find that icons seem to have a poor quality as you increase your font size. This will give you control over how you want your icons displayed (12 font size). To start, let’s adjust the width of the columns.
Time Saving Technique: Adjust your Columns to the Same Width
Instead of trying to manually adjust your column widths one at a time to match one another, highlight all of the columns that you’d like to adjust and then use your cursor to drag one of the lines between the column letters. This will adjust each of the highlighted columns to the same width.
Setting Up the Cells for Conditional Formatting
- Each cell within each month column will equal the value to the right of the cell. You can then copy and paste your first value into all of the other cells by highlight, typing CTRL + C and then right clicking on one of the highlighted cells and selecting the paste formula option.


- Once these values have been established, you’ll type CTRL + 1 (assuming all of the cells are still highlighted). You will then use custom number formatting to show nothing within the cells. If we want to show a value of blank in a cell not matter what type of value is input in a cell (positive number, negative number, zero, or text), we need our custom number format to read – ;;; (yes that’s 3 semi-colons in a row).

For more on custom number formatting, check out these links for further details:
- 5 Amazing Excel Custom Number Formatting Tricks
- Using Custom Number Formatting Syntax
- Ultimate Guide to Custom Number Formatting
Step 2: Excel Dynamic Conditional Formatting Using User Inputs
Alright, let’s move on to setting up the conditional formatting to work with your value input cells. Above your actual sales, you can see the minimum and the optimum sales target rows. These are set by the user of the dashboard/interface. In this case, one nice way of using this flexibility would be to alter and change these numbers to determine where the majority of your salespeople are falling. If you want 20% of your salespeople to be in above and beyond your optimum sales target, you can adjust and play with your targets accordingly. You can also use these as a mechanism to help promote further effort as it’s a great way to track sales as a KPI (Key performance indicator).

Now in order to do this, you have to select each individual column based on monthly targets and then refer to the optimum sales target and the minimum sales target values for each month. Once we’ve highlighted the cells that we’d like to apply the conditional formatting icons to, we will head to the home tab, conditional formatting, new rule.

From new rule, select format all cells based on their values. From here, you can select format style of icon sets and then select your icon style. Once you’ve done this, you will then change your type format to number and then refer to the monthly target for the set of cells you are conditionally formatting (in this case the first row). You’ll then apply and setup the formatting the exact same way for all of the other months.

After you’ve applied and setup the conditional formatting for each the months (you should have 12 different conditional formatting rules, 1 rule for each month referring to each of the different targets), you can then proceed with updating and changing your sales targets as required as shown below:

Summary
Being able to build flexibility into your spreadsheets should save you from having to update and review a report every month or year for your boss or colleagues. Using referring cells with conditional formatting saves you from having to do any additional work in your workbook. You build the dashboard/presentation once, and then the users of the dashboard control and update the parameters of the final product. If you are going to take away anything from this post I would suggest that it be the following:
- In order to save time, always make sure to consider referring to a cell/range for your conditional formatting (or for any type of functionality in Excel). This provides flexibility to the user and can also save you extraordinary amounts of time.
- Be smart during the creation process by using simple techniques and shortcuts in Excel to make your life easier. In this post, we looked at how we could select multiple columns at once and adjust the width of all of those columns. This of course ensures consistency across the dashboard.
Now I have a question for you, what’s your favorite way of using Excel conditional formatting?
Sources and Resources
- Chandoo.org – Excel Dashboard Template – Premium Version (affiliate)
- Juice Analytics – A Guide to Creating Dashboards People Love to Use
- My Online Training Hub has also developed an amazing Excel dashboard course that I highly recommend if you are interested in taking your dashboard skills to the next level (affiliate).

